Pages

Tuesday, January 28, 2014

The Coraline Clutch from Swoon Sewing Patterns

http://swoonpatterns.com/shop/coraline-clutch/?swn=46

Once again I am head over heels for the newest bag pattern from Swoon Sewing Patterns; the Coraline Clutch. <3 <3 <3

This clutch comes with two different size options, and a wristlet option. I made the large size. Even though I think this bag is just perfect the way it is, I added pleats to mine. 


For a little bit of size comparison in the picture above I am holding the bag; albeit loosely. 
I had my daughter take the picture of me holding the bag, so, of course, she had to have one of her holding it too. She is four years old.


I used Amy Butler's Belle fabric in pine. For the handles I used a yummy faux suede fabric I picked up at JoAnn Fabrics. It was found in the home dec area and is nice and sturdy, but not too thick. It was so perfect for the handles!
The clutch features a recessed zipper. It is probably one of the easiest ways to install a zipper. Which means that this big was really pretty quick to sew up. 


I am already making plans to sew a few more of these. A girl can never have too many bags, right? NEVER!

Now, check out all this beautiful Coraline eye candy! 
Click on the picture to go to the links ;)

http://alicatco.blogspot.com/2014/01/swoon-coraline-clutch.htmlhttps://www.facebook.com/sincerelyjen/posts/652736118120922https://www.facebook.com/photo.php?fbid=509602875819857&set=a.461375100642635.1073741828.460653744048104&type=1&theaterhttp://stitchesandstitchesoflaughter.blogspot.com/2014/01/the-coraline-clutch.htmlhttps://www.facebook.com/photo.php?fbid=184259278450950&set=a.183990525144492.1073741866.128386470704898&type=1&theaterhttps://www.facebook.com/sewsandraUSA

There is also a swap going on for the Coraline Clutch. How fun!! You can find the info on the Swoon Sewing Patterns Facebook page. Registration for the swap is open until Jan 31st.

Tuesday, January 21, 2014

DIY Twisted Ruffle Infinity Scarf


Catchy name, eh? If you are scratching your head right now don't worry. The name will make sense by the end.

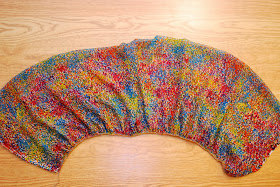
I found this pretty, colorful chiffon on clearance recently and thought it would make a beautiful lightweight scarf. The colors will give my outfits a nice pop that I often lack.


 Quick projects can be so gratifying. This whole scarf only took me 10-15 minutes (minus the picture taking), so I thought I would share.


To start I measured out 24" for the width. My fabric is 44" wide, which will be my scarf length. The width and length are totally up to you. I only wanted a single loop so this was enough for me.


 This kind of fabric can be a bit slippery when cutting...even if you use a rotary cutter. The trick to get a nice even piece is to tear it. That's right, I said tear it. Just cut a little at your mark like I did above.


Then grab it on each side of your cut and let it rip!

When you have your piece of fabric at the desired dimension fold it in half qwith right sides together, matching up the long sides. My fabric here is the same on both sides.


Sew, or serge, your long sides together and attach elastic along the seam. 
I don't usually measure my elastic for stuff like this. I just grab the raw end of my roll and go to town. The amount of elastic needed will vary based on the type of elastic you use, the weight of your fabric, and the amount of gathering you want. I used Lastin, clear elastic, and needed about 30" total.
You can either sew first, then attach your elastic, or do it all in one step as I have done here. Just make sure that you give yourself a little tail to start with (see above picture).


Sew a few stitches, then grab that tail in one hand and your unsewn end of elastic in the other and give it a stretch as you sew. It was hard to demonstrate while trying to hold the camera. So in these pictures you see my same hand on each end of the elastic, but in real life they would each be in different hands. If you havent used elastic for gathering then it may take a bit to get used to. just try to keep that elastic aligned with the sewn edge so that the stitches grab it.


Here is my seam part way through stitching. See on the left how the elastic has made some nice gathers? On the right is the the raw edged part of the side I am still stitching.


When you are done sewing the long sides together you will have a tube of fabric with gathers on one side along the seam.


Turn your fabric tube right side out. this is what the gathers look like from the right side. Not bad :)


This part was also difficult to capture with the camera in one hand. That is my arm sticking through the tube of fabric.


If you do it like me, you will grab your raw end of the fabric tube at the top of your arm. Fold it down over itsself, lining it up with the raw ends at your hand. Your tube will now be folded over on itsself with right sides togther.
When your raw ends are aligned grab your top layer and give it a twist. This will offset your center seam and give your scarf a little twist (pun intended!) from the regular infinity scarf. You can twist it a little or twist it a lot; it is up to you. So...how twisted are you? ;) Haha, i am having too much fun with the puns. I twisted mine a full 360 degrees and then some; probably about 450 degrees total.
 You can see how my center seams are offset in the picture below.


Sew your short raw end of the tube togther (now that your all twisted up!), making sure to leave an opening for turning. My fabric is pretty thin so I was able to get away with only leaving a 1-2" opening. If you are working with heavier fabric you will need a larger opening.


I zoomed out in the picture above so that you can see what your twisted up scarf should be looking like. The edge along the bottom there is my short ends of the tube with my opening.

Turn your scarf right side out through the opening.


Fold the raw edges of your opening down to the inside, aligning it with your seam alloawance. Hand stitch your opening closed and you are all done!

Now...hold on to your seats because I am about to hit you with some awesome modeling shots!!!


Here I am with my sad, boring wardrobe.  :(


And here I am with my sweet new scarf!!!


Hahahahaha! Okay, so my son was the one taking these pictures. You do the best you can with what you got!

The truth is, I am not completely sold on this scarf. I love the idea/twisted technique, I just think it didn't turn out the way I had envisioned due to the fabric I used. It may take while to grow on me, or it may be considered a fail. I had fun playing around anyways. And you bet I will be trying this again with a different fabric!

Thanks for playing with me!


Wednesday, January 15, 2014

Shades of Me: color inspiration

You may have heard the buzz about Shades of Me: The Color Series coming next month. It is an awesome new series from Celina at Petit a Petit & Family and Hayley at Welcome to the Mouse House. They have set out a challenge to sew for ourselves...using color as your inspiration! It is going to be so great!!!
http://www.petitapetitandfamily.com/2014/01/shades-of-me.html

But...wait...I don't usually sew for myself. And how did I end up with the assigned color of pink?...I am not really sure. I would not consider myself a girly girl in the modern sense. I am much more earthy. So how am I going to pull of the color pink; from head to toe!? Hmmm, well it will be a challenge that is for sure!
Ever since I signed up TONS of pattern ideas have been flying through my head. Honestly, the patterns are the easy part (I will probably be eating my words here when I try to properly fit a garment to myself); it is the color that is giving me designer's block. So....I set out to find a little color inspiration in the world around me. I own almost nothing pink. However, I live in a kid's world, and my daughter loves pink! In fact, I distinctly remember her throwing a fit during a photo shoot and saying, "But there's no PINK!". LOL. It is quite refreshing actually; after having two boy boys. :)


The color is all around me. I just had to open my eyes and see.


Once I started really looking, I also saw how many opportunities the color pink presented.


Are you feeling it!?
Here's to the brave, new, colorful me!...coming soon ;)

And check out that saweeet lineup of bloggers participating! Did I forget to mention that there is a sew-along...and a giveaway...and a Pinterest board? You really MUST check out Celina and Hayley's blogs to get all the fun details! Mark your calendars.

Image Map

Wednesday, January 8, 2014

Girls Basic Leggings - free pattern!

I love my daughter's girly style, but this time of year dresses alone just aren't warm enough. So I drafted up a quick pair of leggings. 

*scroll down for tutorial and pattern*


I kinda think they turned out lovely! And since they were so quick to make I decided to make two more. That makes three total...so far  :)


This was the first pair. A lovely poly spandex blend with a silvery lace print was used to make these. They are fun. I could never pull something like this off on myself, so I will live vicariously through my daughter ;)


I kinda think they look sweet with this Norah Dress. It is hard to see in these pictures, but the leggings and the satin both have a little sheen. It contrasts beautifully with the linen blend used on the main body of the dress. [see my Norah Dress post here]


These were the next two I made. The first is from a fun zebra print jeggings fabric. The next pair was made from sweater fabric with a high lycra content...does that qualify these as swants?


So here is the fun part... I am sharing my pattern with YOU! It is available for download in size 6.
*Download pattern here*

*update: Here is a layout of the pattern; in case it helps when when printing and taping it together.

Somehow I managed to make three pairs of leggings without taking one darn picture. So, since I am working on learning Adobe illustrator, I figured I would whip out some quick sketches for the tutorial instead. Ha...ha, ha, ha...HA!!! These were not so quick to whip out. Maybe someday they will be for me, but I could have made at least another three pairs of leggings in the time it took me to make these sketches. Oh, c'est la vie! It was good practice at least.
With that being said, it is going to take a little bit of imagination when viewing this tutorial. Pretend with me that you see no mistakes at all, okay? ;) I included a yoga waistband option in the pattern download but did not include it in my tutorial. But if you have any questions at all please feel free to contact me.  :)

Pretend that the inseam in these pictures is sewn together with a serged seam...or a narrow zig-zag.


***CORRECTION: fold ankle hem up 1/2" to wrong side, press and repeat; folding up 1/2" again.***

The underside of a double needle stitch will have a zig-zag between the two lines of stitching. We will pretend that is what it looks like in my sketch too ;)


Whew! that was a lot of work for a simple tutorial. LOL. The things you do for love (the love of sewing, that is!). I hope you've enjoyed it!